Showing posts with label garden. Show all posts

Wednesday, July 11, 2012

July Garden Update


Man!
It's already July. I haven't done a garden update since waaaaaay long ago, so let me get you the skinny.
First of all, let me say that my particular location in "Urban Polk county" doesn't quite get the sunshine it needs to grow plants from seed I think. Every great looking tomato plant I sprouted when last I blogged about gardens damped off when the plants got about 6-9 inches tall.
There's probably a way to get around all that business, but I haven't figured it out yet.
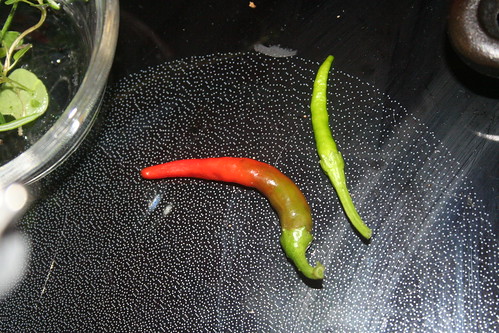
My eggplants and cayennes all damped off too.
I did manage to get my heirloom Brandywine tomato vine to gimp along during the winter though, it didn't die till June, and probably could have gone longer, but it was growing in the compost heap, and it was time to work some compost, so it was sacrificed. The compost heap also produced an EXECELLENT! crop of cherry tomatoes from some volunteers. I couldn't believe it! There they were growing in the compost heap...
Anyway, interesting things are happening in the ol' heap. Mainly, it's getting me some GREAT compost. Every where I spread the stuff, good things start to happen. I let it get real hot mid May/June, making sure I turned it over nice and often. I had a plan for using it.
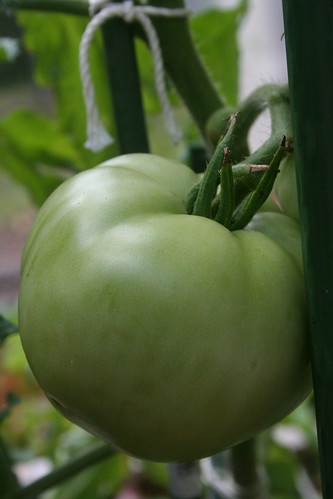
Because I can't seem to start tomatoes from seed in this location, I decided to go ahead an Grab a couple of plants at the beginning of June to plant and see what happens. I went to the local Blue themed hardware store, got some heirloom "Red Beefsteak" tomatoes, a couple of cages, and some high test dirt to make my own custom blend.
Earlier this year, I split a white barrell I saved for making a pair of potato containers, and I decided that Tomato sounded enough like potato to be grown inside them instead. I filled the bottom half with some compost from the heap, and mixed my magic dirt up, and put it on top. My idea is that the compost would provide some micronutrients, organic matter, and a moisture sponge for the growing soil to rest on. Think of it as a firm bedrock. I sunk the plants into the top of the containers and they barely reached the top of the second wire of the tomato cage. The bottom wire was at or near the soil level.
Here's how they look now:
Number 1
Number 2
We'll see if they make it out of the summer alive!

I gave them some Epsom salt this morning because the bottom looked like it was starting to yellow. Usually, this has something to do with a magnesium deficiency and Epsom salt gives the plant magnesium.


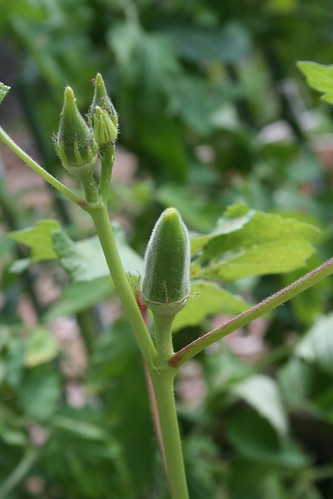
Blossoming hope for the future!
That isn't the big news though, on Sunday past, I received three plants that could change my chili perception forever!

Three Little Birds


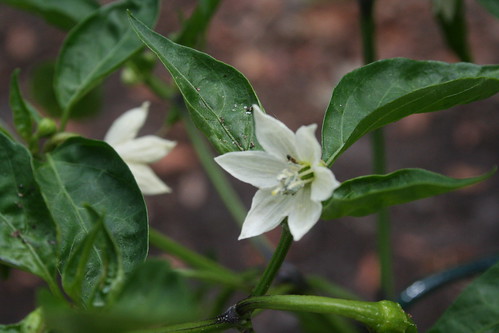
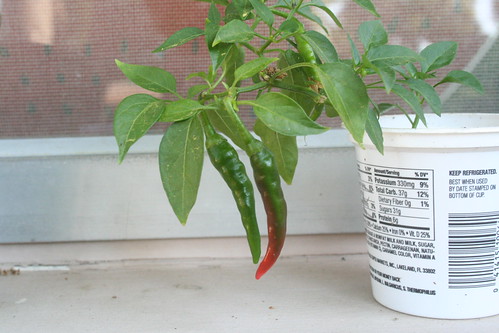
They are Bhut Jolokias, volunteers from a FOAF, so they are in a sense, Living Urban Legends! heh!

Somehow, that seems appropriate for a plant with a name like "Ghost Chili"
 I separated the plants today, and gave them a magnesium drink too. They seemed to like it. They'll be ready to go into a container in about a week. They've just been dug up, and I want the roots to show some vigor before I try to transplant them again.
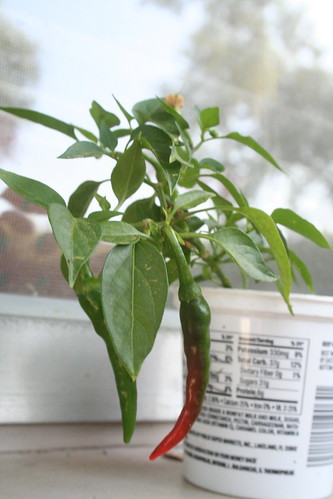
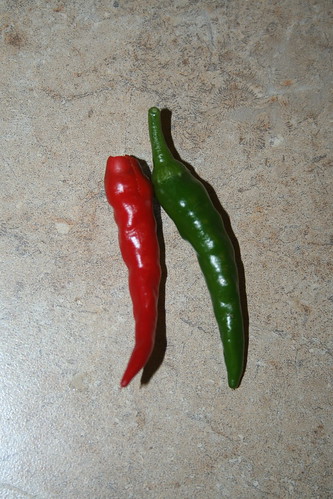
Sittin' by my Doorstep
I hope they make!
I'm going to try and find some more info on the parent plants.
Tew Be Continued.
I have further compost volunteer adventure stories to tell, complete with SCIENCE!

Saturday, February 11, 2012

Heirloom Tomatoes part 2

Ok, here's part two of my quest for awesome heirloom tomatoes, Rutgers variety.
You've already met the players, let's get a closer look at what's in those hippie egg trays:
Not every seed sprouted, but every little cup in the tray had at least one sprouted seed. The new leaves were out on several of the seeds. You could tell the seed were having some problems staying oriented because of the water they were in. Sometimes down is up when you have no root. Surely there is a spiritual lesson in that as well.
Here's a photographic account of how the seedlings were planted:


It's amazing to observe when a child will and will not sit still.
Planting time is a perfect example.

My two year old is normally miss Messy Raccoon, climbing into everything, dumping it out, etc. After we drop off Sisters at their respective schools, it's just she and I for about 3 hours. Usually we go outside, do puzzles, go on walks, exercise, watch movies, whatever to keep busy. If I am doing anything she has to be right on top of it, all up my my business so to speak.  When I planted these plants she was right under me the whole time, and sat still watching everything I did. She didn't grab anything, spill anything, try to pick anything up (at least not while I was busy planting things), or be anything but strictly attentive. She sat in one spot, and watched me plant 24 tomato seedlings.
If you ask her to eat her breakfast though, she can't sit still for more than a bite.

Friday, February 3, 2012

Heirloom Tomatoes Part 1

It's planting time in Central FL!
Time to get the ol' garden growing, here's what I've done so far:
1. Plant some tomatoes, Rutgers. They're from some 2010 seed stock, and they all pretty much sprouted, take that expiration date!
2. Tried to sprout some pole beans, peppers, and eggplant. Didn't do so hot with that, the end result was...disgusting...
I have lots of pics from planting!
First let's meet the players:

 These are the seeds, my Rutgers Tomatoes from 2010. Later on down the line I'll give a close up of what's in the tray. First let me tell you what the tray is. For the last 6 months or so, my family has been intentionally trying to eat better. One of the changes we have made is to use better eggs, namely 4 Grain brand. They don't pay me to say this, but these are great eggs. Pricey yes, worth it? I think so. They remind me of the eggs we got when I was a kid from a friend of the family. Anyway, I'm recycling the cartons to plant seeds. The eggs are packed in a "clamshell", with a lid over top of the clamshell. I cut the lid off (more on what I did with that later), and put water and seeds in the little cups that once held the eggs. The seeds were prepared on January 19th, and I did this planting on February 1st. There were 2-3 seeds in each cup, and every cup had sprouted seeds in it on the first. There was no sign of bad mold.

In the picture on the right we see the peat pots that will take our sprouts and turn them into plantable tomato bushes. There was 32 in the package, we only need 24 for the tomatoes. the extra pot will get eggplant and pepper (cayenne) plants.
This is my dirt. I buy it from a local co-op farm. When I asked him what he was using to grow his great looking produce he told me he was using stuff so good he called it 'soil' and not dirt. I asked him the difference between soil and dirt, and he told me price. When he told me the price for a bag of this stuff I about fell out! I ponied up though, and paid the piper, mainly because I could see the results right in front of me. I have a hard time growing good size produce in my yard because of a lack of good dirt and sunshine. Fortunately, this soil takes care of it's part. I'd probably clear some trees out, but they make great free antenna supports, so I don't complain. I think instead I will be focusing my growing efforts on raising blackberries, if my current vine makes good this year.


Finally we have my makeshift greenhouse. This is a box we had in storage that wasn't holding anything but dust and spider webs. I cleaned it out and made it so that when I potted up my sprouts, they would have a place with high heat and humidity so the could grow fast.


In my next post I'll show you all the steps I went through to get a mini-greenhouse with some tomatoes in it!
Here's a close up of my high dollar dirt:

Wednesday, May 18, 2011

So Fresh and Clean...

Hey, PICS!
IMG_7133
Tomato, homestead variety.

IMG_7135
Yellow Jacket in the lettuce patch, drinking water in between catching bugs.

IMG_7129
Fresh picked cucumbers

IMG_7137
close up Cayenne Flower.

IMG_7138
The cayenne bush as a whole.

Man, I love growing my own food. If you've never done this, you have no idea what you are missing!

IMG_7127
Ate a salad today from my garden, it had fresh lettuce, basil, and cucumber in it. All grown right here at my house.

Remember this flower?

Now, it's gettin' okra in where the flower was!
IMG_7131

Ain't that somethin'!
I can't wait till there's more to show...

Sunday, May 15, 2011

FLOWER!

Quick Garden update:

Okra is in bloom!
I'm excited. Okra is one of my favorite vegetables and perhaps my favorite flower in a garden. The inside of the flower is the best!

The "Half Mexican"

I built an omelette today, inspired by quesadillas and enchilladas. I used no tomatoes, no cilantro, and no bell peppers, so it's only half mexican. I did use sour cream, 'mexican Cheese', and a habanero. The more I eat habaneros the more I realize that I haven't been giving this pepper a fair shake. On this particular go round, I noticed a distinctly sweet characteristic to the spicy suckers. Right before the heat hits you you taste something nice. I think that's the way it's supposed to be. I may start using habaneros in everything, sneaking them into dishes. Cook them a little bit, they won't be so hot.
Here's the recipe rundown:

One pinch each of fresh:
thyme
oregano
sage
basil

and then:
1 Tbsp Sour Cream
1/4 cup shredded 'Mexican Cheese'
3 eggs
1 habanero
1tsp butter

Clarify the butter, cut the habanero into thin strips, and discard the seeds (or save them for the interior of the omelette, if you are a little bold!). Saute the habanero in the butter. Beat the eggs, add to the pan. When the eggs firm up, add sour cream, cheese, sage, oregano and thyme. Shortly before folding the omelette, add the basil. Garnish with a little bit of basil/sage held in reserve, and a dash of Tiger Sauce to give it that last little bit of something. Enjoy!


Omelette, ready for consumption.
In the pic you can see one big chunk o' sauted habanero that I didn't cut thinly. Guess what my first bite was :)

Wednesday, May 11, 2011

Gardening in a Box.

Normally, I do things a little outside the box. This time, outside the box is inside the box!
HA!


I love getting my hands dirty in good soil. I also love reminding myself of the simple truth: "If I want to live, something else must die."
That's some hard philosophy for you, and it's not what this post is about. This post is about gardening using a technique I have modified from "Square Foot Gardening" . I bought the newest book at a big box hardware store so I could start raising the food I eat instead of just going to the store. Previous attempts at gardening have only been minimally effective, I wanted to try and do something good and right, and I'm finally starting to see fruit, literally, and figuratively!

I don't wish to critique Mel Bartholomew's book Square Foot Gardening because I didn't follow his instructions exactly. I didn't build the soil he said to build (and I don't think I will), and I used slightly different materials. I didn't do anything different out of spite, or because I thought I was doing it better, I did it because I've learned to be pragmatic, especially when time is of the essence. I was already late in getting the boxes built, I feared I might become downright hasty if I neglected doing something beneficial soon! I'm glad I did things when I did them, I was able to learn some valuable lessons:
1. The thing about a raised box garden is that the magic is in the raised box! I believe that is the single most important thing I learned. Building a box, covering the bottom with a weed fabric, and controlling the soil you use to grow your plants are the things that seem to provide the greatest results. Isolate the environment to compensate for a lack.
2. Watch it like a hawk. Because your environment is isolated, you may have to make a quick reaction to what's happening in and around the soil, especially when it comes to water. When you have a raised bed, with weed fabric accross the bottom, it's hard to water too much, but it can be very easy to water too little, especially as it gets hotter. plants can't develop deep roots, so you have to compensate.
3. Have a plant support system established before you build the boxes. One of the things Mel says do, that I didn't was build a netting trellis. I couldn't find the netting, and instead of pragmatically just getting some tomato cages or stakes, I neglected to do that, and the plants quickly went willy-nilly. Bad call. I finally staked the tomatoes today, and got them off the everything. My tomato production will probably suffer as a result.

Other general notes include, the next time I do tomatoes, i will do one variety at a time, just to keep seeds pure. I will also locate some netting, because I think I could get better tomatos if I'd been training to to grow on a net instead of just staking them, staking will damage the vine. I'll do fewer plants too. Ultimately, I'd like to have a group of cherry tomatoes growing overhead. I think I could do that, and have it be awesome.

The garden is beginning to bear fruit. it's gone from this:


To This:

The tomatoes are producing tomatoes, although none have turned yet. The cucumbers are going strong, we've already had one. I've gotten basil, rosemary, sage, thyme, oregano, radishes, and various greens. I've also had a hand full of blackberries.

updates as summer and harvest progresses!

Saturday, May 7, 2011

New Omelette Listing on Side!

Every time I create an omelette, I will add a link to the blog article associated with the omelette to my page entitled "Grand Omelette Listaria!" so that if you want to view a particular omelette you may. I may, from time to time, also provide on that page unseen pictures, or whatnots pertaining to omelettes! Enjoy...

Saturday, April 30, 2011

Spicy Sunrise, Done Right!

This is spicy done right!
Raw_Cayenne
Cayenne Peppers. Fresh picked, ready to ride.

Today's omelette is called, "The Sunrise" because it's the perfect way to start your day. It's got kick enough to get you moving, and is filled with cheesy beefy herby goodness to keep you eating it.
Ingredients:
2 Eggs
Louisiana Hot Sauce (the Brand you will need more than one drop!)
Sliced roast beef
Slice of American Cheese
Fresh oregano
Fresh thyme
Fresh rosemary
Fresh Cayenne peppers.

Here's some of the ingredients ready to go:
Raw

Beat the eggs with the hot sauce, you can add a lot of hot sauce to the eggs because the heat will break down the hotness, and leave the flavor. You want to use maybe add a pinch of Tony's (you oughta know what that is :) ) Warm and butter your skillet up, add eggs, wait for them to firm up, add cheese first, then roast beef, then herbs. Finally you can add chopped cayenne to the mix, to your taste for heat. Something like this should be the result:

Resting_finished

Mine is cayenne mustached as a tribute to the matador who has conquered the bull, and placed him in the omelette!

Flavor wise, this omelette's strongest characteristic is the flavor of the hot sauce and the heat of the fresh peppers. The flavor of the hot sauce intensifies in the cooking process while the heat from it mellows. I add the cayenne pepper for spice not only because they are spicy, but because the cayenne is the base pepper for Louisiana hot sauce. The 'other' famous hot sauce from Louisiana, Tabasco is made from tabasco peppers. Tabascos are nice peppers, and plenty spicy, but they have a noticeably different taste than the cayennes. Cayennes to me have always had a bell-pepper like crispness to them, mainly because they are a cultivar of Capsicum Annuum as are bell peppers, and tabasco peppers are Capsicum frutescen in heritage. Sometimes the flavor of frutescens variety peppers is described as 'fruity'. Tabascos are less fruity to me than thai's but they have their own character. My dad grows them, perhaps he have input. I like them, especially fresh, or in Asian food, but cayennes are by far, my favorite pepper.

Enjoy!

Friday, April 8, 2011

Fresh Herbs and Hot Peppers Make Me Smile

So_Fresh

"Take the Train to Happy Town!" W00T! W00T!

Above you you see my latest adventures in both omelettes and the absurd. in that bowl are today's featured ingredients, A habenero, a serrano, and a cayenne, it's like some joke wrapped in an eggy blanket.

or a dare.

I love the spicy things, and today's omelette was a little spicy. It was also a little sloppy, and cooked too fast. I put too many mushrooms in it. Too fast, too spicy, too much filling. All about extremes today. Take a look:
Finished_Product

I couldn't even get it folded over. Here's the ingredients:

sliced habenero chilli with the seeds removed.
sliced serrano chilli with the seeds removed.
chopped green cayenne with the seeds intact.
sliced bell pepper
sliced mushrooms
swiss cheese
garden fresh sage and rosemary.
garlic (browned in butter before adding eggs.)

I wanted to make a skull and crossbones garnish out of the mushroom and bellpepper, but the overall sloppiness of the omelette takes away from that.
To summarize, last week's omelette was perfect, this week's omelette is spicy. It's a dare.
I can do better.
I can make spicy and perfect.
Do you have a spicy food story? One where you were surprised by spicy?

Lame attempt at Skull-n-bones:
IMG_6897

Friday, April 1, 2011

Feta! Tomato! Basil! Oh My!

Openface_far
Open face omelette, ready to be folded.

Today's omelette is a delicious endeavor in creating a fresh, clean, crisp taste. I wanted to show what the omelette looked like on the inside because I wanted to prove a point, when you feel good on the inside, you'll be good all around.
NOMNOMNOMNOM
that's what I did to this omelette. People, this omelette is all about clean flavor! I am thoroughly convinced you can make this and taste something wonderful. first a recipe:


  • 1/4 of a medium sized tomato, diced

  • 2 cloves sliced garlic

  • 2 Tbsp chopped fresh basil

  • 2 Tbsp crumbled feta

  • 2 Tbsp Whole milk or real half and half

  • 1 Tbsp unsalted butter

  • 2 eggs

  • celery seed (pinch)

  • rubbed sage (pinch)

  • salt (pinch)


  • Melt butter in cooking pan, hold 3 slices of garlic in reserve, smash the rest, and add to butter, saute. Beat eggs with salt and milk (or 1/2 & 1/2), and add to pan once garlic has browned on both sides. Allow eggs to firm up, add feta, tomatoes, remaining garlic, celery seed and sage. Once cheese is melted, and eggs are mostly firm, add basil, fold, and flip. turn off heat and wait a minute to allow the eggs to glue everything together. Remove, and add basil garnish.


What you get then is a wonderfully flavored and balanced dish. The tomato and feta combine smoothly, and the fresh basil fills your mouth, while the celery seed leaves it feeling clean. The sliced garlic adds a sharp spice, and the sage serves well as a background transitioning the flavors from feta and tomato, to garlic, to basil/celery finish. So far, this omelette has had the cleanest flavor of the three that I've made. y'all come over in a couple of weeks when I have more basil, and maybe even a fresh tomato, and I'll make you it!
I goofed the plating a little bit, wasn't holding the dish close enough, and broke the omelette a little bit, that' ok though, it's why we use a tasty basil sprig garnish! More pics:
Closeup of the omelette, pre-folding:
Openface_close

Ready to Eat! Chipped plate and broken omelette included for Wassassabi:
Omelette_1

Monday, March 28, 2011

Strange Daze...

It's a rainy day, so God is doing the work of wetting my garden, I did have to turn the compost today though, and did so in a light rain. No biggie, I still worked up a sweat, and was amazed at how warm the heap was. Composting works! When it gets ready, it will probably go in the front yard, around my landscaping, mainly because this compost is questionable, i keep finding grubs in it even though it's warm. I don't want to add problems to my garden, I already don't get enough sunlight for my taste. Why add grubs!
My garden is a square foot garden, although I admit the pepper plant is in a container, and is likely to remain in a container. My goal is to see how big I can get this cayenne, and how long it can survive. I would like to plant seeds from this cayenne though, I have three set aside, from my first red pepper, and look forward to planting them. Even though the plant was in only moderate sun, the pepper did turn out to be good and spicy! perhaps there's something to the old grape growers tale that struggle makes for good grapes.

On a side note, handling a shovel on a daily basis is reducing the wimpyness of my information service oriented palms. I almost got a blister!

Friday, March 25, 2011

Peppers!

So I found a package of Cayenne seeds left over from two years ago, the last time I seriously tried to start a garden. They were an heirloom variety, and pretty spicy from what the package claimed at least. At some point last fall I said "what the heck!" and planted them in a yogurt cup. I figured if anything, I will grow a small pepper plant in a small pot over the winter, and it will be fun. I put the pepper in the windowsill, and watered it. It bloomed, but it was cool enough all winter that the blooms fell off, and the pepper slowly grew. Finally, in February, the blooms set fruit! I had tiny cayennes on my bush, even though the bush was growing in a yogurt cup. I started taking pictures when the pepper started turning red, mostly to upset my yankee cousins who are still experiencing the thralls of winter, whatever winter is.... (side note, Florida has four seasons: They are Dry, Rainy, Summer, and Hurricane, in that order.)

So I now present to you a complete timeline of my amazing over winter cayenne pepper goodness. This morning I ate it.
In_Cup
Side_view_in_cup
New_Pot
ready_2_chop
omlette
Omlette ingredients include: 2 eggs, splash whole milk, two chopped cayenne peppers (one red, one green), salt, cheese, 1 clove sliced garlic, and sage.

Thursday, April 17, 2008

First Fruit!

If you consider squash a fruit, my garden is bearing fruit!

first one came out yesterday, and i planted two more seeding maters, some betterboys to be exact. some of the romas are in bloom, and soon we'll be up to our garterbelts in tomatoes!
i can't wait.

pepper plants are doin' fine too.

i silently thanked a foraging bluejay yesterday i spied chompin' on some insects round the garden. birds are awesome like that.

some notes on C++
it's lame compared to ruby, but at the same time it grows on you. the structure takes a while to appear, but at least it's not as bad as something totally lame like visual basic at least.

lets face it, you'll not be using gedit or anything sans smart tab complete to write a vb program, yet w/ c++ there are shortcuts.

ruby is still my baby though.

it's a wonderful mess.

PIECE OUT!!
GB HOYT